Lever Pins for my Lever Espresso Machine

Lever espresso machines have the lever attached to the group with steel pins and snap retaining rings.  These rings require a special tool to remove.  I have also seen different retaining rings that push on.  Either kind is a pain to remove and I have scratched more than one lever handle removing them.

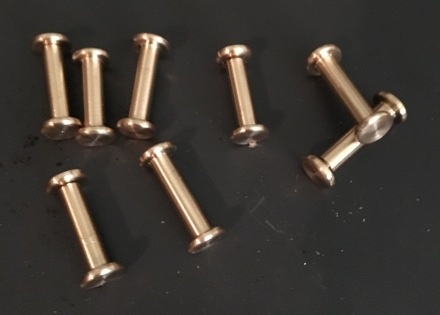
The solution, brass lever pins with a screw on the end to make easy removal.

We start with 360 brass rod 1/2″ diameter from online metals, I also picked some more up from 6061 Dude on ebay (great prices and shipping).

WP_20160511_12_55_21_Rich

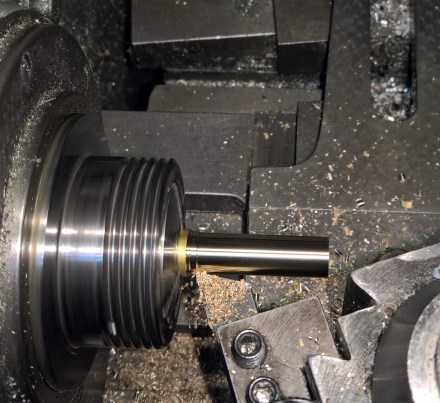
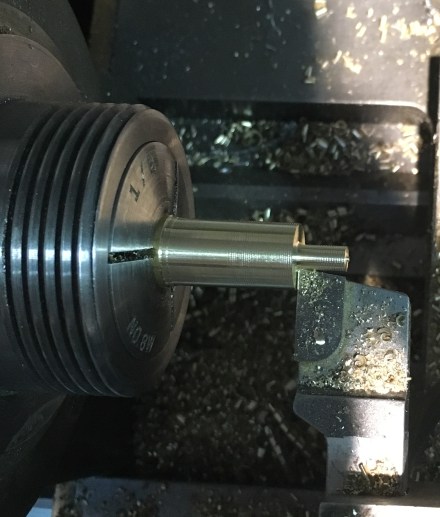
Next step is to clean up the rod.  No rods are not perfectly cylindrical from the factory.  Machinist and tool and die folk know this but this was new to me.  I turned the outside down to 7/16 or so for the outside of the pin.

20160511_190320328_iOS

Next up, center drill.  How I ever was able to drill without one of these?

Drill with a #29 for a 8/32 tap.

WP_20160513_13_16_07_Rich

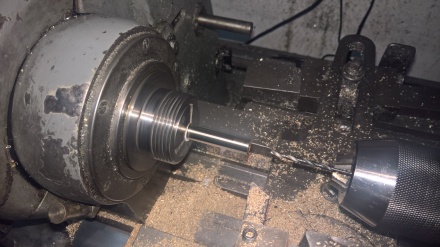
Early, when I first started making these I would tap at the end of all my cuts.  Now I just do all the drilling and tapping before I turn down the pin.

The pin diameter gets turned down to match the steel pins.  The width is based on the machine.  Cremina’s were 1.1″ wide, Pavoni’s varied from Gen 1’s .95 with the cast handles, to the gen 2’s with the pressed handle at .87-.9, La Cara .94, La Graziella .928, and Millenium Pavoni at .857.  I had 12 machines to do so I custom sized each pair.

Once turned down to the right pin diameter I round the edges just a smidge with a file.

WP_20160513_13_11_27_Rich

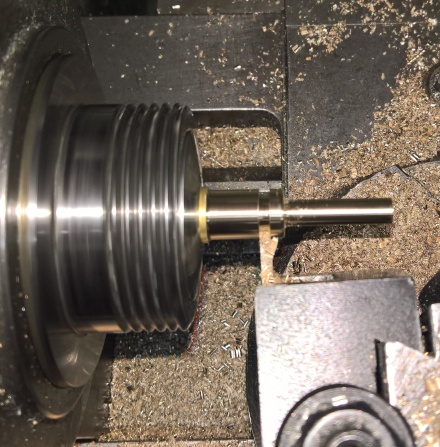
Now we are ready for to cut off the pin.

WP_20160513_13_12_19_Rich

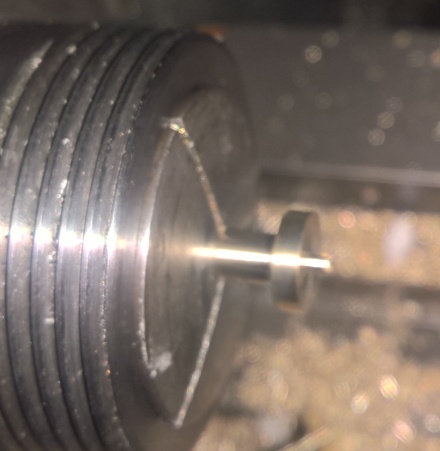
Then i re-insert the pin back into a smaller collet and finish the end to size and round over the corners like before. Sorry for the out of focus photo.

WP_20160513_13_25_00_Rich

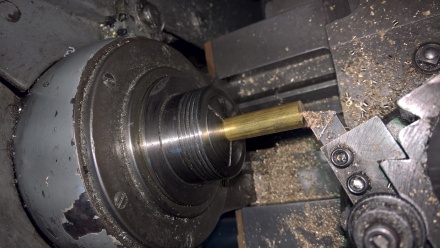
Now how do we make the other end.  The same procedure is used for the end except we are turning down to a diameter to use a die for threads instead of for the pin.

20160527_200338693_iOS

Once turned, we use a die.  A bit of oil and it takes but a moment to cut.


20160527_200410714_iOS


20160527_200448433_iOS

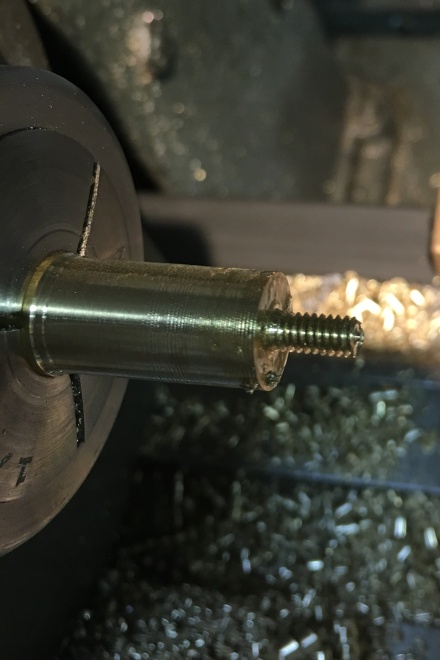
Next we clean up the inside and outside of threads to length.

20160527_200634609_iOS

The cutting off is the same as the other.  I re-inserted it into a collet and trimmed the end to size.  On occasion I would tighten the collet a bit too tight and I’d have to run the threads through the die by hand to clean them up.

20160516_214422310_iOS

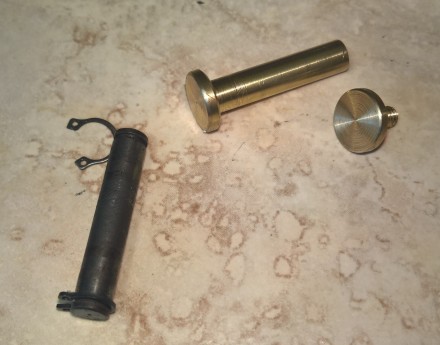
The old and the new.

WP_20160511_15_10_23_Rich (2)
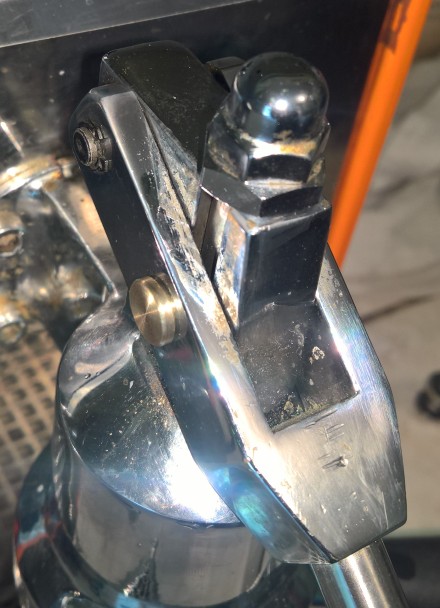
Installed on a Cremina next to the old pin still in the back.  Apparently I need to clean my machine more as everything shows up in the photos!

WP_20160511_15_16_38_Rich (2)

What did we learn here:

  • I get a lot faster with each set.
  • A CNC lathe would make this much faster and automated or a screw machine. I don’t need that many and I do not have access yet to a CNC lathe which would make them profitable to sell.
  • Maintenance now is so much easier. No longer do I have to search for snap ring pliers or worry about scratching the lever.  I just unscrew with my fingers and remove the pins.  They stay together quite well and on occasion I tighten them if things loosen up.

Other solutions I have seen people do is thread brass rod with acorn nuts.  I didn’t like the aesthetics of the acorn nuts so I went this route.

Brass wears before the steel lever, piston rod or the group head and was selected for this reason. These are expected to wear and are easier to replace than a rounded out group head or piston rod. I use some pin lube from Orphan Espresso on installation.

Another upgrade is using bearings with the back pin instead of the roller.  I did get some from ebay , MR126ZZ 6 X 12 X 4 Bearing, from the seller rc-bearing .Shims from McMaster Carr, part number 98055A106, Spring Steel Round Shim, 0.2mm Thick, 6mm ID, 12mm OD. I put three bearings with shims between and on the outside.  This replaces the back roller.  For more info on this check out home-barista.com and search on lever pins.  This upgrade was from the contributor DrGary.


Rebuilding the La Pavoni Generation 1 73/74 Element Repair and Rebuild

Base came back from powder coat and I reassembled.  Quite easy once one has taken a dozen of these apart or more and re-assembled them.

Checking the element with a volt meter set for resistance one can see if its leaking to ground.  Well only if its really toast, a Megger is what is needed to really test an element. The megger puts a real actual load on the element while testing.  Too bad I don’t have one of these!

So what to do?  Element seemed fine. I installed the element. Lets plug it in and test.

Boiler filled with water (critical as you do not want to fry your element!) or it will come out looking like this:

WP_20140719_005

This is what happens to an element one leaves on with the boiler empty!

Plug in the La Pavoni,  and I check with a volt meter the tank to ground. Crap 40 volts!!!  Every damn one of my old 200/800 elements went to crap when plugged in.  I saw from 3 volts up to 80 volts, amps, not sure but you are not supposed to see any voltage to the boiler!

Well 40+ years of scale, crap water, put away with water in the tank, etc has left pin holes in the elements.  When voltage is applied at 110v and a tank of water, voltage to boiler :(.

Now all these old La Pavoni’s have 2 prong cords.  Something of note, the 70-73 has a ground on the boiler ring and the ground wire is in the cord, just cut off at the plug.  The 73/74 does not have that ground or the hole on the boiler ring.

An old element and a rebuilt side by side, you can see the old ones have had their better days.

WP_20151118_002

So how does one go about a new element?  The fine thread elements on the right are no longer made by La Pavoni.  You can’t get them new.  The option is a fine thread conversion ring and a new stainless element.  Thing is, you can only find the fine thread conversion rings on ebay every once in a while and a place in Austria that rarely has them in stock.  I am looking into getting some made in the future but that is another post. So that is out for the moment.

There is a factory in Hungary that still rebuilds them on the side.  Yes you heard that right, you can get them rebuilt.  Francesco who has the history of the La Pavoni and other machines on his site and lots of useful information has the contact info.  After sending overseas which takes about 2 weeks it then gets sent over for rebuild which takes a month or so, then two weeks for shipping back to the US.  Is it worth it?  Look at this new rebuilt element up close:

WP_20151130_20_14_46_Pro

Its a work of art!

Here is a rebuilt La Cara element before and after:

WP_20150724_002

You can see the rough texture to the element.  You can’t see in this photo but it was actually soldered for repair at one point.  I bought this machine as a parts box so this was not unexpected.

WP_20151117_005

So nice, a work of art in itself one almost does not want to install it into a machine!!


Here is a La Pavoni element reinstalled.  Notice the ground screw on the right.

WP_20151118_015

I drilled and tapped a hole in the brass boiler ring for a stainless cap screw to hold the ground.  This meant adding a new cord with three prongs.  Now if there is voltage to the boiler it will go to ground and to a ground fault outlet that will trip!  If you have one of these machines you must run it for your own safety on a GFCI outlet!!!

No voltage to boiler, yay!  New elements to last another 40 years, yay!

Please send me your old elements if you have them kicking around without a machine 🙂  If you have a machine that you toasted the element it, all is not lost, its repairable!

Removing a 1972, 73, 74 La Pavoni Europiccola Boiler from its base with a home made spanner

As seen in a previous post I have somewhat of a La Pavoni problem.  I like the old ones, the 1972, 73, and 74s.

A few differences from the newer ones:

  • The group head screws into the boiler. The newer ones the group head bolts to the boiler.
  • The boiler cap is also different as it has female threads and a flat gasket versus the male threads and the o-ring gasket.
  • The portafilter gasket is square and flat versus the o-ring style on the newer ones.
  • No safeties except for the pressure relief valve. This means you can burn it up.
  • A brass ring mounts the boiler to the base requiring a spanner to remove.

A 1974 La Pavoni Europiccola I found on ebay for a pretty good deal.  I picked it up as a spare to my 72 and 73.  It is missing the porta-filter and the grate but those can be easily sourced.  This base is a bit worn on the paint side so my plan is to powder coat it.  Now to powder coat or paint,  the boiler first has to be removed from the base.

WP_20150616_001

As you can see before the boiler can be removed the element has to be removed.  As shown here, the three leg oil filter wrench is useful in removing boiler heating elements.  This can be found on amazon or your local auto parts store usually. There is a smaller version and it is not nearly as useful or as strong.

wrench

WP_20150616_004 1

The next obstacle in removing the boiler once the element is removed is the brass ring.  You’ll see in the photo there is a hole on the left side.  There is a corresponding hole on the right side.  Previously I have tried using the oil filter wrench but there is not enough room to get in between the base and the ring properly.

Next option, put to 5/32″ drill bits in a metal or wood vise the width of the ring and try turning.  This way actually can work but it generally bends the drill bits as they are too long to reach the ring.

I then tried 3/16 steel rod filed down at the top to fit into the ring.  These too also bent as the base is an inch or so tall so the pins must reach from the vise.

Another opting is to whack at the holes in the direction you want to turn with a brass rod, that is an option as well and I have used it but do not really recommend it.

This round after taking two of these apart previously, I decided to make a proper spanner.  This only took maybe 10 minutes and is really easy to do.  Using the 3/16 rods I had tried to use in the vise, I straightened them back the best I could.  I then dug through my scrap bin for a bit of aluminum. I found a piece of square channel and cut off a few inches just barely wider than the ring so it could still turn freely without hitting the sides of the base.  I then drilled 2 3/16 holes the width of the holes on the boiler ring. Then I tapped the old pins through the holes with just enough sticking out to hold the ring and keep the aluminum against the boiler base.

WP_20150618_003

Then it was time to put it in my vise and try it out.  A woodworking vise would have worked as well here.  I did not trim off the excess as I didn’t have time for that though it would make it look cleaner.  One could just have easily welded something out of some scrap steel.

WP_20150618_001

I set the entire machine on top lining up the holes with the spanner pins from below.  I then simply rotated the machine with the base and group head held firmly and off the ring came.

WP_20150618_002

You can see the ring on the spanner.  This worked really well.  You can also apply some heat with a torch to the ring.  I usually need to use a torch to loosen up finicky boiler elements and rings.  This time it was a very clean machine and came right off.

WP_20150618_004

Now with the ring off its time for powder coat.  Then its new gaskets and reassembly.  This unit style the 72-74 the group head does not come off.  When the base is off you have easy access to the seal at the top of the group head to change it.  Otherwise with the base on you are working with a mirror upside down with snap ring pliers.  Both ways work but I’ll take the previous any day.

Any questions please comment, I have about 7 of these machines at the moment, 4 in rebuild stages.  I have a millennium but I generally stay away from later machines if possible.  They both make great shots and I have had them side by side on the counter.

Espresso old school manual lever style from La Pavoni Europiccola 1973

We purchased a 2010 La Pavoni Stradivari Europiccola a ways back new in the box.  It took us a few years to figure it out 🙂 but that is another post.  Short version get a great grinder, oehandgrinders.com not a bad place to start, love the lido 2. No idea why I was surfing for Pavoni’s but well I was and I won the auction. New to me Lever La Pavoni from ebay :

1974-pavoni-4

This is the ebay photo.  The Pavoni wasn’t in horrible condition. Gaskets were dried out and the base was quite corroded.  The 73/74 La Pavoni’s have an aluminum base.

IMG_2050

Inside looks good and a quick descale would be sufficient.  With the base corroded I decided to strip down the entire machine and send the base off for powder coat and blasting and restore the machine with all new gaskets.

IMG_2048

Pictures are great for the wiring, these elements are impossible to replace new (requires some work, hopefully show this on another parts machine in a future post).

IMG_2052

The heating element is off and we are looking inside the tank from the bottom.  I used a oil filter wrench to remove it. Notice the brass ring holding the boiler to the base.  This presents a challenge. Option 1 if the boiler isn’t seating incredibly tight you might be able to remove it with the oil filter wrench but it has very little surface to grab on due to the sides of the base.  Option 2 is to get a spanner, since I did not have a lot of metal tools handy this was out for making.  Now I know some machine shop people who could make one up for me.  Option 3 was to put two pins in a vise and then drop the machine on top and turn.  This actually worked!  There are two paper gaskets here.  These will be replaced.  They do not provide any water tightness to the machine, just apparently for the boiler to not fuse itself to the base.

IMG_2062

The base with everything removed and ready for blasting.

IMG_2063

It is difficult to see the corrosion but it is mainly on the bottom where it met the rubber base.  More would be found when blasting it.   IMG_2065

The date can be seen here, 12 Mar. 1974  These are rare machines as the group head screws into the boiler without a flange.  Newer La Pavoni’s use a flange (a later post will show a 77 rebuild).

IMG_2067

Freshly back from the powder coater in Sea Foam Green (a left over color he had from a previous project).  If you are in Denver, Lee at Pristine Powder Coating does great work big or small.

IMG_2073

All the parts and pieces set out for assembly.  All new gaskets were purchased from Orphan EspressoEspresso Care also is a great source for La Pavoni parts. I have used them both and they provide great service. The assembly is the reverse of taking it apart.  There are several sites that show the group head rebuild and I do not have much to add.  Go light on the food safe grease.  It is wise to have a correct sized screwdriver to take apart the sight glass screw or it will get all munged up.  Later I added a teflon safety valve kit from Espresso Care.

IMG_2077 

The wiring was in good condition on this one so I reused it and connected it back the way it was when I took it apart. IMG_2074

All complete! Makes great espresso with a proper grinder.  Do not attempt to make a La Pavoni lever work with a chopper, a cheap Capresso burr grinder as they cannot be tuned to the level the Pavoni requires.  I recommend a stepless  burr grinder.  Seattle Coffee gear has a cheap Baratza Encore that can be tuned to a fine grind.  I have not tried this but check it out and do your research. I use two different step electric grinders 😦  An Elektra MSC and a La Pavoni Zip modified with a Mazzer Mini Hopper both make for great espresso. The hand grinder I use daily is the Lido 2 from Orphan Espresso which is crazy fine tunable! And despite the comments to the contrary I have read on blogs the grinding is not difficult.  We use it twice a day for 4 lattes a day and I have no problem and neither does Kristen.  Kristen says the grinding helps wake her up 🙂

InstagramCapture_788fad25-7514-4a00-b50a-3014e458c25c_jpg

We picked up a bottomless portafilter from Espresso Care mentioned above and here is a shot pulled with it, quite tasty.  Luna Roasters Espresso Ottimo is our favorite medium roast and works great on the La Pavoni.  I do now use Aero Press filters on top of the coffee puck to prevent the fine grind from going back into the boiler, they work great and do not affect the espresso! We dump the tank less often now and when we do its clean.   Caveats:

  • Always unplug the La Pavoni when finished.  This prevents the accidental over toasting of the heater element which is difficult to repair.
  • After unplugging we remove the base if steamed milk or water went down the sides.  Even a powder coat can fail if left soaking in a pool of water.  One option would be to run a bead of silicone around the base to prevent water from dropping down inside the base.  This is why you see the bases of old machines corroded.
  • Never run the La Pavoni or plug it in without the base on!  There is a live electric under there!
  • Never leave in reach of kids or unsuspecting adults!  It will burn you!  It will, there is no escaping it 🙂
  • Never remove the cap until the unit is cool or you can severely burned!  That boiler is under a lot of pressure.  Make sure it is cool and there is not steam pressure by opening the steam wand valve.
  • Always wait for the pressure to relieve itself through the portafilter before removing or you can get burned here as well.  Coffee can explode out on opening the portafilter and it makes quite the mess. If you bricked it by too fine a grind, just shut it off, let it cool then remove the porta filter.
  • Respect the La Pavoni and it will not hurt you, skip common sense and you are at its mercy.
  • If you do not have time to make a good shot and respect the machine don’t make one! It is safer and easier to go to a coffee house whether it be Caribou, Starbucks, or a local shop. (some days this just happens, roll with it)