Espresso old school manual lever style from La Pavoni Europiccola 1973

We purchased a 2010 La Pavoni Stradivari Europiccola a ways back new in the box.  It took us a few years to figure it out 🙂 but that is another post.  Short version get a great grinder, oehandgrinders.com not a bad place to start, love the lido 2. No idea why I was surfing for Pavoni’s but well I was and I won the auction. New to me Lever La Pavoni from ebay :

1974-pavoni-4

This is the ebay photo.  The Pavoni wasn’t in horrible condition. Gaskets were dried out and the base was quite corroded.  The 73/74 La Pavoni’s have an aluminum base.

IMG_2050

Inside looks good and a quick descale would be sufficient.  With the base corroded I decided to strip down the entire machine and send the base off for powder coat and blasting and restore the machine with all new gaskets.

IMG_2048

Pictures are great for the wiring, these elements are impossible to replace new (requires some work, hopefully show this on another parts machine in a future post).

IMG_2052

The heating element is off and we are looking inside the tank from the bottom.  I used a oil filter wrench to remove it. Notice the brass ring holding the boiler to the base.  This presents a challenge. Option 1 if the boiler isn’t seating incredibly tight you might be able to remove it with the oil filter wrench but it has very little surface to grab on due to the sides of the base.  Option 2 is to get a spanner, since I did not have a lot of metal tools handy this was out for making.  Now I know some machine shop people who could make one up for me.  Option 3 was to put two pins in a vise and then drop the machine on top and turn.  This actually worked!  There are two paper gaskets here.  These will be replaced.  They do not provide any water tightness to the machine, just apparently for the boiler to not fuse itself to the base.

IMG_2062

The base with everything removed and ready for blasting.

IMG_2063

It is difficult to see the corrosion but it is mainly on the bottom where it met the rubber base.  More would be found when blasting it.   IMG_2065

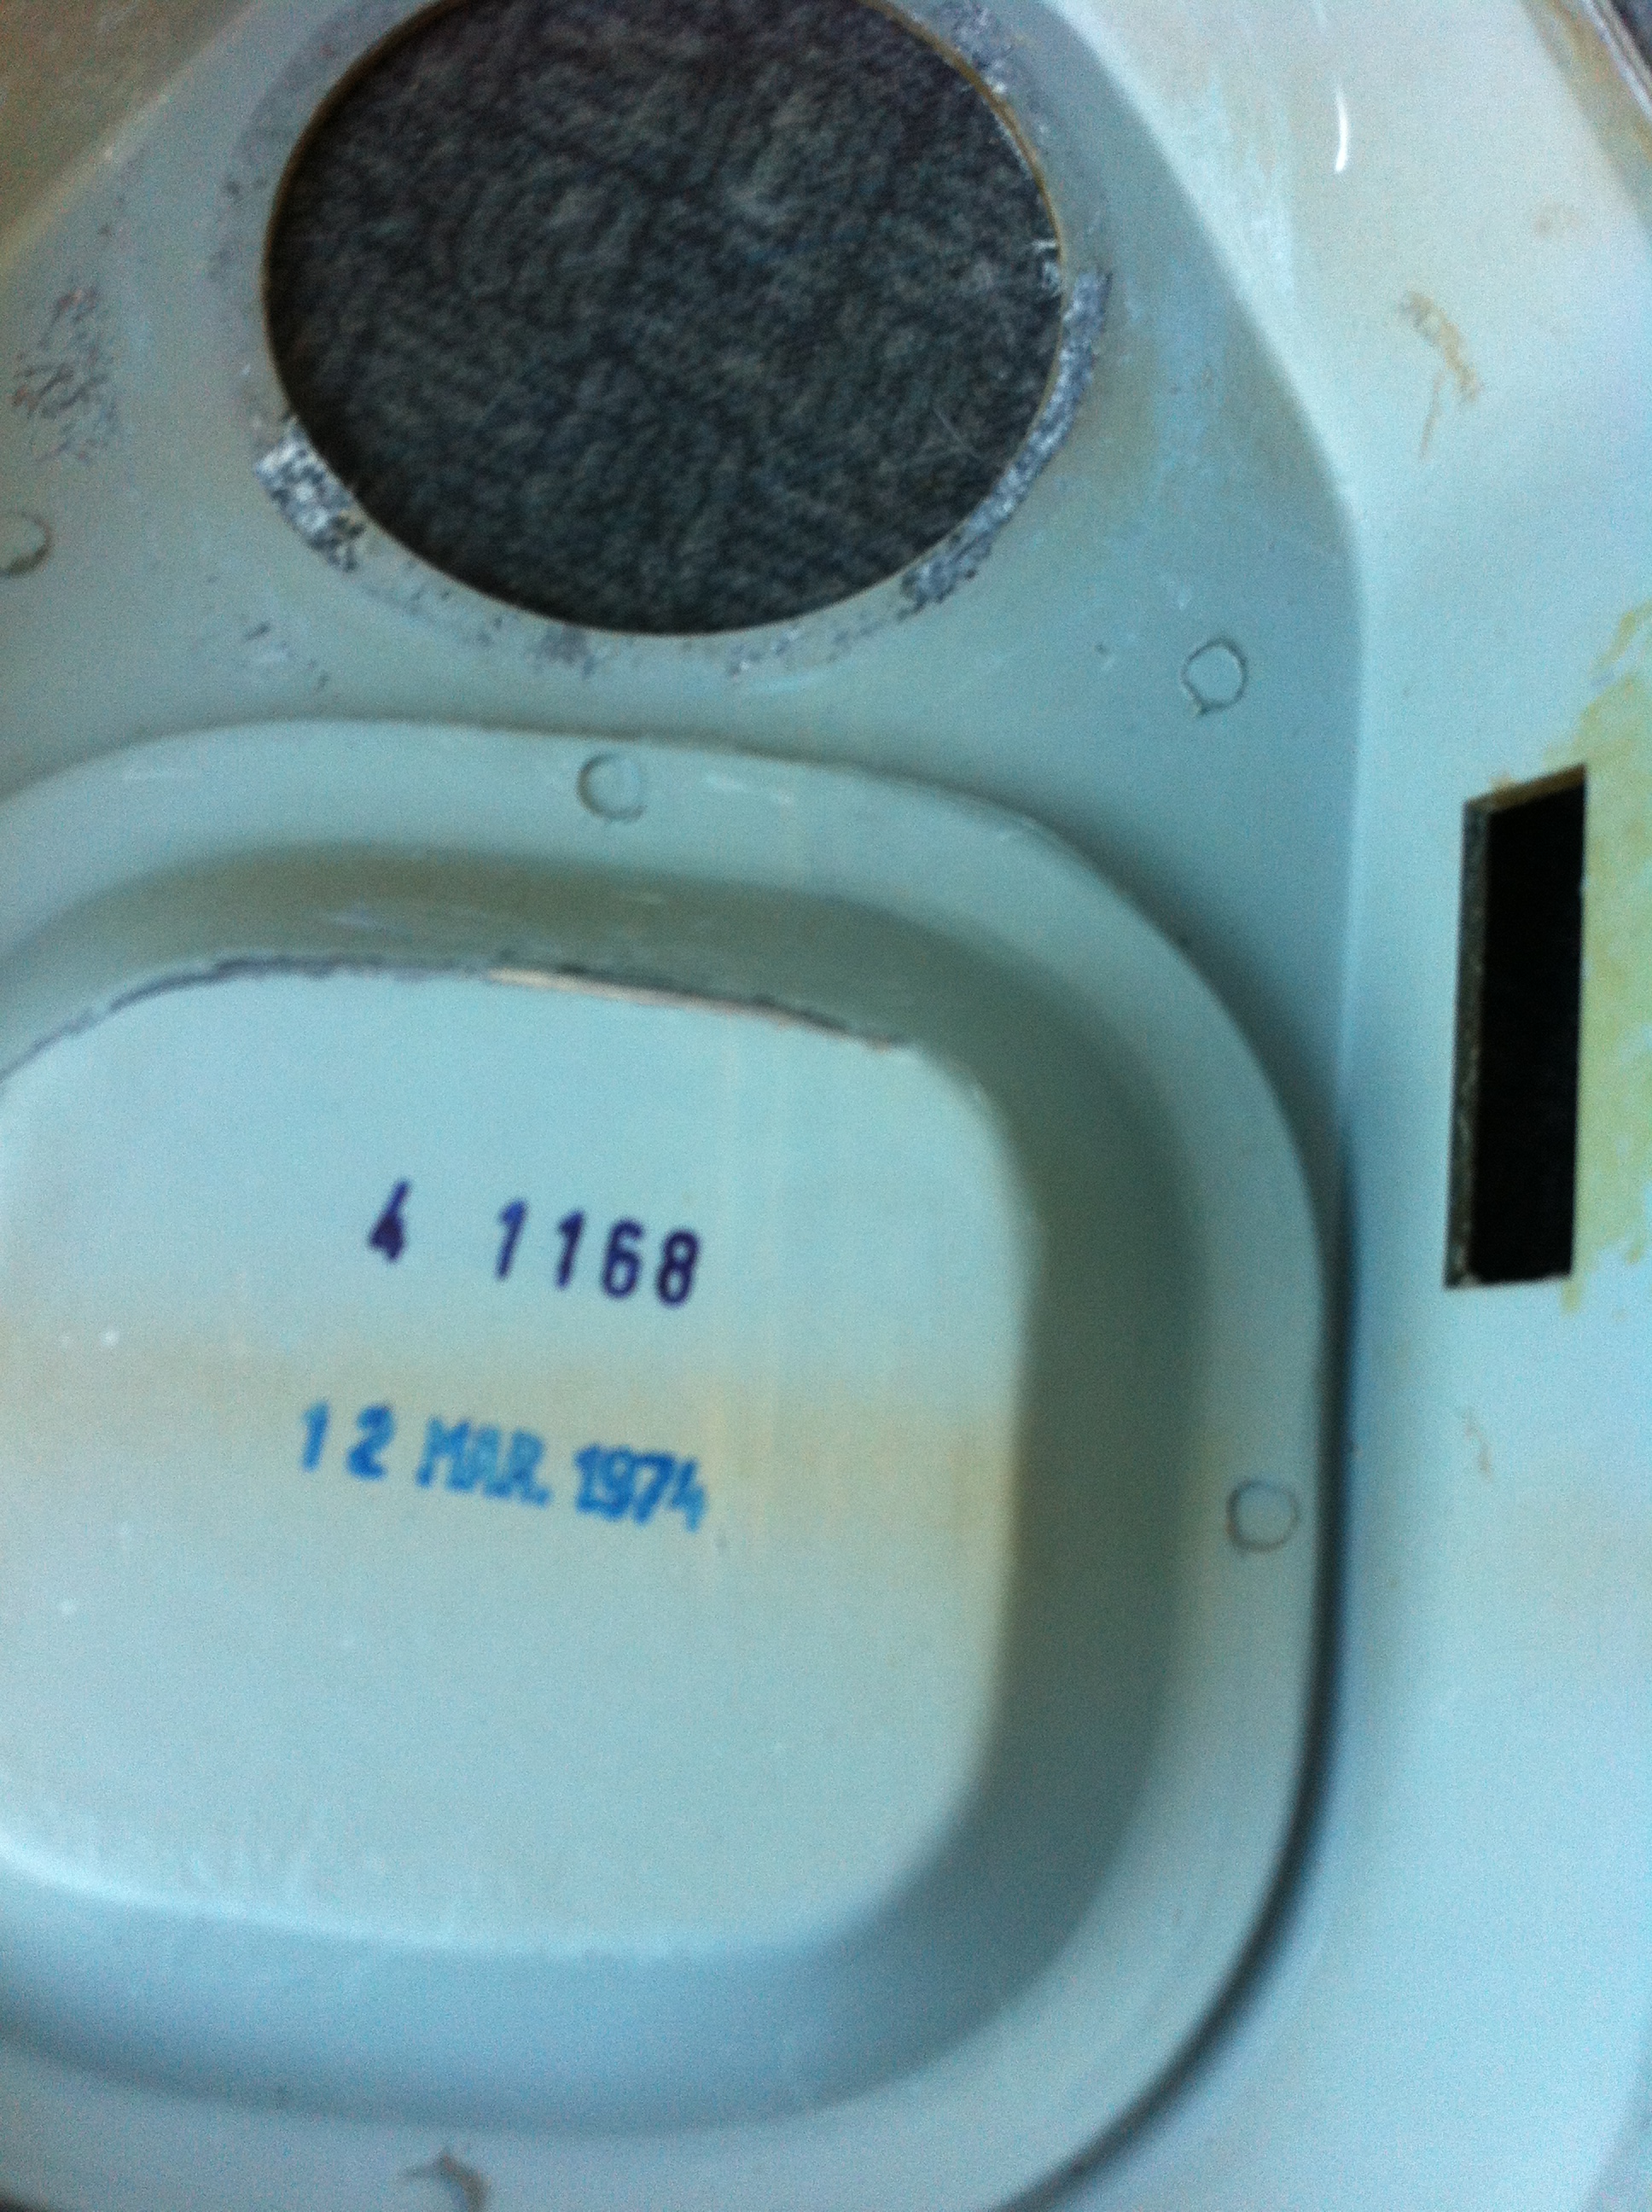
The date can be seen here, 12 Mar. 1974  These are rare machines as the group head screws into the boiler without a flange.  Newer La Pavoni’s use a flange (a later post will show a 77 rebuild).

IMG_2067

Freshly back from the powder coater in Sea Foam Green (a left over color he had from a previous project).  If you are in Denver, Lee at Pristine Powder Coating does great work big or small.

IMG_2073

All the parts and pieces set out for assembly.  All new gaskets were purchased from Orphan EspressoEspresso Care also is a great source for La Pavoni parts. I have used them both and they provide great service. The assembly is the reverse of taking it apart.  There are several sites that show the group head rebuild and I do not have much to add.  Go light on the food safe grease.  It is wise to have a correct sized screwdriver to take apart the sight glass screw or it will get all munged up.  Later I added a teflon safety valve kit from Espresso Care.

IMG_2077 

The wiring was in good condition on this one so I reused it and connected it back the way it was when I took it apart. IMG_2074

All complete! Makes great espresso with a proper grinder.  Do not attempt to make a La Pavoni lever work with a chopper, a cheap Capresso burr grinder as they cannot be tuned to the level the Pavoni requires.  I recommend a stepless  burr grinder.  Seattle Coffee gear has a cheap Baratza Encore that can be tuned to a fine grind.  I have not tried this but check it out and do your research. I use two different step electric grinders 😦  An Elektra MSC and a La Pavoni Zip modified with a Mazzer Mini Hopper both make for great espresso. The hand grinder I use daily is the Lido 2 from Orphan Espresso which is crazy fine tunable! And despite the comments to the contrary I have read on blogs the grinding is not difficult.  We use it twice a day for 4 lattes a day and I have no problem and neither does Kristen.  Kristen says the grinding helps wake her up 🙂

InstagramCapture_788fad25-7514-4a00-b50a-3014e458c25c_jpg

We picked up a bottomless portafilter from Espresso Care mentioned above and here is a shot pulled with it, quite tasty.  Luna Roasters Espresso Ottimo is our favorite medium roast and works great on the La Pavoni.  I do now use Aero Press filters on top of the coffee puck to prevent the fine grind from going back into the boiler, they work great and do not affect the espresso! We dump the tank less often now and when we do its clean.   Caveats:

  • Always unplug the La Pavoni when finished.  This prevents the accidental over toasting of the heater element which is difficult to repair.
  • After unplugging we remove the base if steamed milk or water went down the sides.  Even a powder coat can fail if left soaking in a pool of water.  One option would be to run a bead of silicone around the base to prevent water from dropping down inside the base.  This is why you see the bases of old machines corroded.
  • Never run the La Pavoni or plug it in without the base on!  There is a live electric under there!
  • Never leave in reach of kids or unsuspecting adults!  It will burn you!  It will, there is no escaping it 🙂
  • Never remove the cap until the unit is cool or you can severely burned!  That boiler is under a lot of pressure.  Make sure it is cool and there is not steam pressure by opening the steam wand valve.
  • Always wait for the pressure to relieve itself through the portafilter before removing or you can get burned here as well.  Coffee can explode out on opening the portafilter and it makes quite the mess. If you bricked it by too fine a grind, just shut it off, let it cool then remove the porta filter.
  • Respect the La Pavoni and it will not hurt you, skip common sense and you are at its mercy.
  • If you do not have time to make a good shot and respect the machine don’t make one! It is safer and easier to go to a coffee house whether it be Caribou, Starbucks, or a local shop. (some days this just happens, roll with it)

The magic and mystery of chocolate tempering

Chocolate, who doesn’t like it?  Ok, I have met a few people that don’t like chocolate, I can’t get my head around that. Why pay a fortune for “boutique” chocolate bars when you can make them yourself. Most places don’t make the chocolate from bean to bar and start with already made pistoles or bar chocolate (explained further down). First of all let me give some great reference material: Chef Ewald Notter’s The Art of the Chocolatier (ISBN 978-0470398845)  is a great book and I took a class from him back in Orlando years ago. Jean-Pierre Wybauw any of his books on chocolate decoration. I took his truffle class at the Notter School as well. (the Notter School is unfortunately closed now). Materials:

Chocolate of your choosing (or mostly your choosing).

Do not use chocolate chips as they have wax in them to keep them stable so you get that great look. Do not use stuff from Michaels or anywhere else that is used for fountains or for coating.

Go to Whole Foods, Rocky Mountain Chocolate Factory, Sur La Table, Williams and Sonoma or your favorite store that carries the pure chocolate form. Pistoles are my favorite but you can use the block form as well.

 chocolate-brick-1

Block chocolate requires a chocolate fork to break it up easily.  A chef’s knife can also be used. Either way be vary careful when breaking up block chocolate to keep all ones fingers.

I myself lean towards the pistoles as they melt evenly and when you are hungry easier to snack on (little discs of chocolate, basically a squished large chocolate chip) .

Chocolate is defined by cocoa solids percentage. White Chocolate has no cocoa solids thus isn’t really chocolate instead its milk solids, sugar and cocoa butter. Milk Chocolate is in the 33-34% range that I prefer, Dark around 63% is my favorite. I can’t do darker than 63% without getting a migraine. I have used 70% in the past for truffle filling but not for coating as it can be close to bitter. Yes there are people out there who like to brag about like 80% chocolate, I am like more power to you. I don’t need to eat baking chocolate, I like my sugar.

I order my milk chocolate in small pistoles from Bakers Cash and Carry in Utah and my Dark from AUI-Swiss

Note, people have different tastes, what works for me doesn’t work for everyone.  Before you go buying 11lb boxes try some smaller samples if you can.  Guittard is what the chocolate factory uses and several places carry that.  Callebaut is great as well.  A few varieties of each brand can have vastly different cocoa contents and texture so search around.  Maybe you’ll love the science of it enough to make it from bean :). One companies milk chocolate tastes very different from another companies at the same cocoa solids percentage.

The chocolate arrives tempered in the box or bag. There really is no great reason to re-temper it if you don’t want to. You can just melt it and make sure you do not take it above the temp that will melt the crystals (See table at the end), But lets back up a bit. What is temper? Cocoa butter has crystals when it cools from a liquid to a solid. If this cooling is too fast or too slow you get the wrong crystals. The wrong crystallization structure gives you chocolate that melts in your hand and does not have a nice sheen to it. Tempered chocolate is chocolate that has been cooled down properly to form the right crystal structure. When fully cooled it will separate from the molds easily, have a snap and gloss to it. The cocoa butter crystallizes not the chocolate solids.  Since its very hard to see cocoa butter through the cocoa solids, Lets start with straight 100% cocoa butter so this is easier to understand.

OLYMPUS DIGITAL CAMERA

One tub of cocoa butter, yes I paid too much for this but the education was worth it. We melt the cocoa butter over a pot of water.  Note, you do not need buckets of water in the pan below, it should be at a simmer not a boil and it does not have to be in an expensive pot, tempering machine, chocolate warmer,  etc (unless that is what you want)!

OLYMPUS DIGITAL CAMERA

Keep it moving around and we start to see the crystals melting and changing back into liquid form.

OLYMPUS DIGITAL CAMERA

Now if you take it too hot you will get rid of all the crystals as they can’t survive  have to reform the crystals.  There are two ways to introduce proper friendly crystals: tabling and seeding.

Tabling involves pouring on to a marble slab or other surface and you control the cooling to get your crystals started.  These are then folded into the rest of the ,melted cocoa butter on the slab and they seed and multiply the cocoa butter with good crystals. This is fast and requires a bit of practice but it works well and I have to say great to learn.

Seeding is the method of melting the chocolate and dropping in roughly 1/3 already tempered chocolate with the proper structure, these then seed the crystals that form when the hot chocolate cools down.

Tempering take the temps up to 115-120 ish, I have read up to 125 degrees for dark and 110 to 115 for milk and white to completely melt out the crystal structure.

OLYMPUS DIGITAL CAMERA

Fully melted. Now to the table, see how clear that is, no crystals. And notice this is just a 1 inch pastry slab, you don’t need a marble counter though it would be nice 🙂

. OLYMPUS DIGITAL CAMERA

Crystals are starting to form its darker, you will actually see the cocoa butter change as you work it.

OLYMPUS DIGITAL CAMERA

And we get closer to temper state here. Consistent agitation helps encourage crystal growth.

OLYMPUS DIGITAL CAMERA

Don’t make this hard!  Its really quite simple.  We melt all the crystals away. Then with controlled cooling and agitation we introduce them back into place. With chocolate you just have to take on faith what is happening as you can’t see the crystals form like you can with cocoa butter. Don’t go crazy with a thermometer, they are helpful but don’t have it be your only tool. You can see the look of tempered chocolate with experience.  You can take a sample on a pastry scraper and cool it in the fridge quick.  If it has the shine and snap to it you are there. There is no rush here, you don’t need to panic, you are not on a food network contest.  You can keep it warm with a heating pad or use the poor mans double boiler above.  If you keep the chocolate within the tempered range after tempering it will stay there. Temperature ranges at temper

  • 88-91 degrees for dark
  • 84-87 degrees for milk and white

If you fail, you start again! Chocolate can be re-tempered multiple times. It may get thicker though so you may have to add more chocolate to the mixture. Be aware of seizing the chocolate.  Chocolate and water DO NOT MIX!  If water gets in from the double boiler being too hot, etc it will seize up, you’ll know it happens.  No going back, use it for brownies or chuck it. Some other useful info:

Hotter rooms with more humidity will take chocolate longer to set!  AC is your friend as is working on a cool day or evening in the summer.

I have used a heat gun to warm the surface of the chocolate in the bowl, then stirring it in

Much more detailed information and trouble shooting can be found in Chef Notter’s book or feel free to ask in the comments. Stay tune for more posts to follow when I get to the real chocolate and not just cocoa butter.

Zig Zag Chairs with the design from 1934.

Zig Zag Chairs, they look cool don’t they.  I saw a post from Tools For Working Wood‘s facebook page about New York Custom Contracting building a zig zag chair for a Festool demo.  I was like I have a Domino Joiner!  I should be able to make that.  So I ordered a 5’x5′ sheet of 3/4″ Baltic Birch from Boulder Lumber (free delivery! take that big box stores) that arrived in a few days since I ordered on a friday.  I have the Festool Domino 500 and thought the 8×50 domino’s should work.  I think New York Custom Contracting used 8×100’s but they must of had the Domino 700 which does crazy deep tenon’s.  The original design calls for bolts at the miters.  I think the Domino’s look nicer.

Now all I am missing are the plans!  Tools for Working Wood carries How to Construct Rietveld Furniture that gives complete measured drawings.  So I ordered up a copy and waited for it to arrive.

This is pretty straight forward, I cut  all the parts to width.  Now there are all sorts of funky angles on this chair as you can see.  I cut first to the largest width of each panel and stacked them up. 1 5×5 sheet is enough for three chairs.

I needed to set up a tenon jig, not to cut tenon’s but to cut the steep angle on the table saw.  I also picked up a CMT Digital Angle Gauge (this thing is spectacular, easy to zero, super easy to set the blade to whatever angle is needed).  My bosch contractor saw with a 80 tooth blade struggled on these miters I will not lie.  The saw did make the cuts cleanly as long as I went slow with feeding the plywood.  That steep angle makes for a very deep cut and at 80 teeth, one needs to be gentle.

With the miters cut I finished up the length cuts and the slight miter for the tilted back of the chair.  I then laid out all the parts and cut the angles on the sides with the festool TS55 Panel Saw.  Note these don’t fit perfectly as there are quite a few angles going together on the 45’s so I sanded after glue up. Sorry no pictures of the sawing.

Below is the chair mocked up before gluing.

WP_20140530_009

Gluing was interesting how does one clamp these things?  I don’t have a picture but I set up some stops and used tape to hold the miter closed and upside down to the table.  Once the glue had setup I used the Domino 500 to seat a loose tenon perpendicular to each face so they lock together the miter joint.  The tenon’s will not fail as they are solid!  So its left to the ply to fail and its 3/4 Baltic Birch with many layers so not likely.

WP_20140530_010

Next its glue the back on.  Easiest way to do this is with more tenon’s.  If one ever does this, that angle on the back is pesky!  Lets just say I know this from experience, you have to make sure you have the Domino lined up correctly or you are cutting a new back.  The plans call for dovetails here and well thats tricky on that angle and I love the Domino 500 so Domino’s are it.

WP_20140530_012


The domino’s did not go all the way through as I did not have a 700 which can cut much deeper.  They went damn close though.  I was able to file the complete hole with a file but that was not as clean as a 700 could do.  The first chair was a mock up really so I didn’t mind experimenting.  For the next two I did not try to go all the way through.  The dominos went just beneath the surface of the other side. In fact, one burned through when sanding but that is fine I like the look.


WP_20140605_004

All sanded and ready for finish.

WP_20140531_002

The three of them stack nicely.

WP_20140605_006 

I actually sent these out for finishing as I don’t have a room or garage to spray them in.  They were sprayed with varnish.  They came out quite nicely and are a hit with the visitors.  Not bad for a sheet of plywood.

WP_20140613_002

If anyone is interested in the design Tools for Working Wood carries the book which has measure metric drawings of all of Rietveld’s designs.

Fixing auto upholstery in a 1998 Honda Civic EX

The mighty civic has been through a lot. Its been backed into three times just on the drivers side. It was hit twice on the passenger side. Still the might civic plods on! 36-42 mpg with its mighty v-tec and 5 speed manual. Yes it is a clown car for me as I am almost 6′ 3″ but it is a blast to drive.

So onto the upholstery. The front driver seat was torn between the side panel and the main seat panel. Well since I have that handy dandy Kingmax industrial sewing machine I might as well put it to use.

First, I gathered materials. Colorado Auto Trim and Supply in Denver has bought the end runs from all the manufacturers. Though this is a 1998 there was none left but being they had hundreds of samples we found a great match.WP_20130703_001

Now I remove the front seat, very easy to do in the civic. I remove the hog rings with a pair of pliers. Now make sure you have a pair of hog ring pliers if you ever work on older car seats , to put them back together or you will be making it a lot harder than it is. I was able to get the seat cover off without taking the seat apart. Note, this would be a great time to put in heated seats had I been thinking ahead. You see that little ring of metal in the middle of the picture.  That is a hog ring.  The pliers wrap that sucker in a circle around the embedded wire in the seat cushion/base.  Without these your seat will not be snug and will look like crap.  Don’t even try channel locks, order a pair of hog ring pliers from amazon if need be.  McGuckin Hardware had them in stock in Boulder.

WP_20130708_003

When it is apart the seat looks like this:

WP_20130708_001

I take the panel apart with a knife which I found to be easier than the seam ripper I tried and broke on the seam.

WP_20130703_009  WP_20130703_006

The seat was pretty worn out as it was the driver seat on 167K mile civic so I also decided to change the side panel as you can see its almost disintegrated on the back side of the panel.  You’ll notice some plastic supports to be sewn back in, this is not problem for the Kingmax but it is for a home machine.

WP_20130703_010

I used the old panels as a template and sewed it up on the Kingmax with 69 bonded nylon. It didn’t take that long. A few seams, making sure to sew over the junctions and get it all back looking like a cover.

WP_20130708_005

Time to stretch the cover back over the seat and re- hog ring it.  Then I installed the seat back in the car. Still working great to this day. Notice that fine toolset in the photo, on loan from Kristen.


Next up as we are doing well so why stop with the seat!  Onto the armrest.  It is toast, worn to the threads.

WP_20130715_005

This is easy, no sewing machine involved.  Just 3M spray adhesive  77 and some fabric.  First we remove the covering.

WP_20130715_006

That was quick, pulled right off.

Spray the fabric and spray the armrest, let dry. I use a mask and do this outside, I also use safety goggles no need to have a errant spray in the eyes.  Gloves are good as well as this stuff doesn’t like to come off.

Wrap that fabric slowly as this is contact cement and it holds well.  So work it from the middle out and we get the final product.


WP_20130715_004

Screw back the various hinges and hardware and we are done.

WP_20130715_009

This was early July 2013.

So you want to sew some webbing together! You need an industrial sewing machine

I had some webbing I wanted to sew together for my Pilates reformer.  Specifically foot straps and some foot straps for my pole system.

Extra heavy duty webbing is 3/32 thick, two pieces stacked is 3/16 and a triple stack used on my straps is around 5/16″ thick.  So this means you are not sewing this on your girlfriends or wife’s Janome!!! This requires an industrial sewing machine.  What is an industrial machine?  How about we start at what it is not?  The old singer in the table you see on eBay or at a flee market is not an industrial machine.  If it has a tiny motor you can fit in your hand it is NOT an industrial machine.  Yes there are old industrial singers, they have larger gears, and large motors to drive them and they can work fantastic, but make sure you educate yourself before you buy.  I recommend the sewing machine forum on leatherworker.net. Most of the contributors on leatherworker.net have several machines and can help.  You can try your luck at Craigslist if you know what you are looking for.  Make sure it can sew a sample of what you need before you buy.  If it can’t sew, skips stitches, etc don’t buy it as it can be expensive to fix.  I recommend buying from a dealer if you can.   Ralph’s Power Sew in Denver has been great as has Nicko Sew who I have personally worked with as well.  Both of these dealers have great service departments and back up their sales! Go cheap at your own risk, having a good dealer to support you when you machine breaks is priceless.

I picked up a clone of the Consew 206RB by KingMax GA206. WP_20130614_001 They clone all the big machines, you’ll see them marketed by many places as they copy everything overseas.  Consew, Juki, Brother, PFAFF, etc are the main companies.  You’ll see the clones a lot cheaper.  But a lot of the clones are made in the same factories and are pretty much identical inside.  Talk to a dealer that will back up your machine for what will work for you!  This is a big deal as there are lots of parts and they can be difficult and expense to work on if you don’t know what you are doing.  I picked up a used  needle feed walking foot machine.  I can run up to 208 thread on the top though I usually only run up to 92 and 69 regularly.

The needle feed walking foot allows for thick layers of fabric, webbing, vinyl, etc to be fed through the machine as one unit.  The needle is in the fabric/leather/etc while the foot moves the entire set forward for the next stitch.WP_20130614_013  A walking foot is needed at a minimum for thick webbing and leather, needle feed in addition is very handy. Check out the many videos on youtube that show the differences between feed dogs, walking feet, and needle feed walking foot before you purchase!

NOTE:Industrial machines are generally single purpose tools! You may need more than one as they don’t multitask like home machines do. I have a post-bed (for shoes and lots of other stuff) machine in addition to the needle feed walking foot. WP_20131024_005 A straight stitch machine can be useful as well, it depends on what you are doing.


You’ll notice below the industrial machine come with a table, you can’t see the motor below.  I had Ralph’s swap out the clutch motor with a servo motor where I can better control the speed.  There are also speed reducers available to really slow things down.  They can be found on eBay and at dealers for around a 100 bucks.

WP_20130614_020

With this setup I can sew pretty much any upholstery, webbing, leather etc that can be done on a flatbed machine.  Now if you do a lot of bags etc then a cylinder machine might be a better route as you can slide the bag over the base.

The Kingmax sewed through the extra heavy duty cotton  webbing straps like a hot knife through butter.  The needle feed walking foot is the right tool for this job!  92 thread and this machine on a short stitch makes these pretty much bombproof.  The fabric would fail before the thread most likely.  Thread strength varies by size.  A good table to that shows this can be found here.  92 thread is about 15 lbs per stitch.  A few extra passes and this piece of webbing  is solid.


WP_20130615_001


So you say wow that is too expensive for me to buy!  Well this maybe true but you have other options!  Contract sewers in your area will sew up stuff for cheap.  Look for them on craigslist or at your local industrial sewing supply house or upholstery supply.  Another option is a design incubator.  Denver Design Incubator has packages that allow you to use their machines for a small fee.  Don’t skip the project because you don’t have the equipment, someone out there does and can do it usually for a fair price.  Or you can break into upholstery 🙂 and pay of your machine that way which I what I did for Pilates gear but that is another post.


Time to upgrade the 1980’s hotpoint refrigerator or was it a magic chef…

The current HotPoint refrigerator from the 1980’s was on its last legs.  It was just not feeling cold enough.  With concerns of food safety I started a search for a new fridge.  WP_20130104_003

Note, I had removed the doors on the above cabinets before I realized I should take a good before picture.  Notice the fine 1980’s fake wood grain on the handles.   Also notice how short this here fridge is!  There is nothing that goes in this compartment without having to rebuild it except for a super crappy small apartment style fridge.  I wanted a bottom freezer and as close to counter top depth as I could find.  Nothing I hate more than a fridge sticking a foot or so out from the cabinet.  You can buy a counter top depth refrigerator so this does not happen, it goes down in the proper planning category.


WP_20130103_003

I looked at multiple fridges.  Can I just say they are all boring!  Stainless steel, no thanks, so overdone!  I started hunting on the web.  There are several retro style companies out there.  The Big Chill so happens to be based right here in boulder.  My brother and I went to take a look in person.  They don’t really have a showroom other than the website but they are happy to show what they have in the warehouse.  Just so happens they had a Black Retropolitan with the door swing I was looking for.  Turns out it was a return from someone in LA that wanted the opposite door swing.  Their loss was my reward as the owner gave me a discount (who wants a black bottom freezer with a left hand hinge).  It came with an ice maker as well.  It is really an Amana wrapped in a nice powder coated sheet metal with some fancy chrome additions.  It is a perfect match for the edging of my counter tops in the kitchen and our old 1950’s Kelvinator stove.

Well as you can see this is a taller and wider refrigerator than the might Hot Point.  Some demo was in order.

WP_20130104_004

Demo complete.  Something to note here, do not do this!  Scrap the whole damn thing.  Don’t go all Rehab Addict on me.  Take the whole thing out.  Sure reuse what you can, I reused all the old doors in one way or another when I rebuilt it.  The reason I say to scrap it all is its easier to install a new cabinet than it is to try to fit to old out of square existing.  That created a lot more work then I needed to do had I just started from scratch.

WP_20130105_004

Rebuilt with some 3/4″ paint grade plywood. The existing cabinet was a cobble together extension on the left side.  I redesigned the cabinet to have more space on the left and a middle cabinet up top to keep things in proportion (another plug for By Hand and Eye from the Lost Art Press).  All cutting was with a Festool TS55 Panel Saw that made quick work of the plywood sheets.

WP_20130105_006

I had to wait for delivery of the new big chill.  In the meantime I installed the old fridge in the new cabinet.  Notice the height change.

WP_20130111_002

Now you’ll see I added a bunch of drawers.  This cabinet is rather deep.  The space was underutilized before.   I had tried wire baskets and I can say is they suck!  Everything falls through them, nothing sits upright in them well, they just pain suck.  So my solution was 1/2 inch plywood (crap from the big box, never ever, ever again) and slides.  Drawers were all cut on the Festool TS55 saw and the screwed together with glue and the Kreg Jig.  Can you tell I love the Kreg Jig, it has its place.  It made attaching everything to the existing very easy. I filled the holes with Bondo and sanded them off before painting.  Are these pretty maple drawers sprayed with finish, NO. They are white plywood drawers that match the rest of the kitchen style yet providing a huge leap in efficiency for the kitchen.

The middle  cabinet on the top gets a self closer and it also gets a vertical hinge so it flips up.  The middle upper cabinet door is made with a upward hinge from McMaster Carr. I’ll add that at 6′ 3″ I get a lot of use of the upper cabinets that Kristen requires a foot stool to get to.

These drawers are the best thing I did with this project, I have tons of pantry space for what is a tiny kitchen. They took about a day to make then paint. Installation would have been easier had I completely rebuilt. You’ll see that I did not demo the right side completely, I should have.

WP_20130111_001 WP_20140626_001

All the doors in place.  The doors, like our might historic doors from the 1950’s or is it 40’s are plywood with a round over  on the outside and a rabbet on the inside.  Fortunately we were able to scavenge enough old handles from the previous setup to use again on the new cabinet.  You can also see the fridge was delivered.  The owner of the Big Chill and his crew provided deliver services since we were local in Boulder.  They did a stellar job!

WP_20130117_001

There you have it, a brand new fridge from the Big Chill in a new cabinet.  Only regret is not doing a complete demo.  Fridge is great, absolutely love it, nice to have things stay cold.  Something else to note is it has an ice maker.  I had previously put anti water hammer devices on my front loading washer and investigated it for the Ice Maker.  I found Sioux Chief Manufacturing made a great one and this was installed in the wall behind the fridge to a 1/2 PEX connection.   So I only hear the ice dumping, no water hammer on the valve opening and closing.  I  highly recommend these water hammer devices which will be covered on my LG washer post in the future.


Set up Shop with the Naked Woodworker, Part 1

A very good summary of how not to get lost in the weeds! Power tools are very efficient at spoiling material as Mike says, I can vouch for this! I can’t wait for the DVD to come out, going to put my bench on my covered front patio.  Its not where you work its how you do it.

Lost Art Press

siemsen_base_IMG_8465

I hate hearing someone say: “I would get in to woodworking but I can’t afford the equipment.”

Woodworking does not have to be an expensive hobby. It can be, but it doesn’t have to be. A simple workbench can be built in a day with hand tools for about $100. Many tools can be picked up at garage sales and at tool meets. Online auctions or classified sections of woodworking lists such as WoodNet are another great source, as are Craigslist and e-bay.

Do you really need stationary equipment for your hobby? Machines can be expensive – moving them, getting your shop wired, dust collection and etc. will add up quick. Many times it is quicker to do something by hand than to set up a machine or design jigs for machines to do the job.

I find that machines pay off when making multiples. It is the skills that…

View original post 428 more words

LED lit shoe cabinets

Kristen requested shoe cabinets.  Kristen has a problem, and its shoes, too many shoes.  I see no point in a collection being left in boxes as you never can see it nor enjoy it.  So the solution was some shoe cabinets.  Searching the internet we came across Ana White’s website that showed some nice shoe cabinets.  I started with their design and modified them to fit our requirements.  We chose to go with 3 cabinets, one with the same size cubicles, one with 3 different sizes of cubes and one with just shelves.  After reading the book By Hand and Eye from the Lost Art Press I now know why we like the one with the three different size cubes, they are just more appealing and proportioned.

So it begins, I went with a paint grade 3/4 ply from Paxton Lumber, about 55 a sheet.  Do yourself a favor and never buy your project plywood from the big box stores.  Go to your local hardwood supplier and you will find flat stable cabinet grade plywood.  Some big boxes are carrying some decent american ply but most do not.  Last thing you want to deal with is warped stock before you start.  I have had it warp on the way home from the big box. We have three great places, Boulder Lumber here in Boulder will give free delivery so I usually go with them.  Austin Hardwoods in denver is a great choice as well and has a great in stock selection of prefinished and cabinet grade plywoods.

The storage area of choice, the living room!  5 sheets or so.

WP_20130304_001

How do we cut this down you ask?  Well with a Festool TS55 Panel Saw.  With my handy parralell guides made from Instamorph and some aluminum guides we can make quick work of this sheet stock.


WP_20130304_002

All the pieces cut to width, all the same size 🙂

WP_20130307_001

Now to cross cut all the dividers and the shelves.

WP_20130310_001

The easy  one to work on is the straight shelf.  We did multiple test fits with the shoes and arranged the stops, depth and angle until they worked for Kristen’s size 7.  You’ll see some clamps being used.  This setup was put together with glue and Kreg pocket hole screws.  Quick and easy and would make a fine cabinet maker cringe :).


WP_20130312_001 WP_20130312_002 WP_20130319_002


Now the cubby style cabinets were a bit more work.  I didn’t take too many pictures.  The middle shelves, the bottom and the toe-kick are attached to the sides with pocket hole screws and glue.  The dividers were installed with biscuits and glue as I did not want to fill that many pocket holes.  The top is also attached with biscuits and glue.  If I made it again I would probably use dominos for assembly and scrap the screws.

Edge banding was next with an iron and some patience.  I should have edge banded before assembly, oops.


WP_20130312_003 WP_20130313_001

Paint!  Sprayed them with a sprayer.  My sprayer sucked, had to really thin the paint.  I used a latex eggshell.  Now I would either set a spray booth up in the back yard or pay a finisher to spray them for me.

WP_20130319_001


Our house is dark, lighting design is from the 1930’s.  While enjoying a sauna it occured to me we could add LED lights.  A quick search on amazon found some cheap lights, 10 bucks a roll and a transformer for 5 bucks, another 5 for a foot switch and some lamp cord and we were good to go.  Let there be light!

WP_20130319_004  WP_20130320_002

Installed and filled with shoes! Feels like a Nordstrom rack some days.

WP_20130320_003 (1) WP_20130321_001 WP_20130321_002 WP_20130321_003 WP_20131211_016


Also posted on Kristen’s blog http://www.sparklestyleshine.com/2013/03/the-ultimate-shoe-closet.html

Wood Bandsaw from Woodgears.ca

A wood bandsaw you say?  What in the world are you thinking?  Well this is not something that hasn’t been done before!  Check out woodgears.ca for complete plans and sketchup drawings.   I needed a bandsaw to resaw some maple for some night stands I wanted to build.  I have a tight attic space to work in and a standard metal one seemed to heavy and unwieldy to use or fit into my tiny shop.  So what better than a custom wood bandsaw that is light enough to take apart by one person.  The only metal parts are the shafts, bearings and motor.  I have replaced the light switch with a proper safety switch with a start stop.

I used the Festool TS55 track saw for most of the work along with a Bosch contractor saw, benchtop drill press, ryobi bench top bandsaw, a Delta surface planer and various hand tools.  This project is something a reasonably handy person with some time and ok tools can build.  Accuracy is good but most things can be shimmed for alignment in the end so don’t fret if things are off by a few millimeters here and there during glue up, etc.


WP_20130420_002

All the wood here is 3/4″ pine purchased from the big box store and milled down with my old delta surface planer to the recommended thickness.  If you don’t mill it you will just have a wider saw frame which is no big deal.

WP_20130420_003

The glue up begins!  You can never have too many clamps.  I used a Festool table so I could clamp it flat.

WP_20130421_002 WP_20130423_029

Frame is all glued up and quite light!  Matthias did a test between his metal band saw and his wood bandsaw and had less flex on the wood.  All the laminations make it extremely strong.

Next up is the top bracket to hold the wheel and tensioner.  This was done on the table saw where I rigged up what is essentially a tenon jig to cut the slots for reinforcements.  Glued in the oak and that frame is rock solid.  A few other cuts for rabbets, etc and you end up with the picture on the right.  The shafts are stationery and do not rotate.

WP_20130419_002 WP_20130425_023

The wheels I used spare baltic birch that I laminated together.  I have seen many made out of regular ply and if I didn’t have the baltic birch I probably would have used it.  You can see the bearing glued to the wheel and my non OSHA approved lathe to add the crown to the wheels.

WP_20130428_001  WP_20130427_001 WP_20130429_004

Wheels mounted with a blade.  Followed by the table attachments and we have a bandsaw! Though the support leg is clamped to it as there is no base and well no guards :).

WP_20130427_003 WP_20130429_006 WP_20130427_002 WP_20130501_001

Base and guards.  You’ll notice the construction grade plywood drawers built with the box-joint jig from woodgears.ca which made for a super tight fit.  Note, I made the drawers after the bandsaw was built so I could use the bandsaw for making the box-joint gears.  I also used the bandsaw without the base to construct the bandsaw cut dovetail base out of 2x stock.


WP_20130508_001 WP_20130524_002 WP_20130524_001

Painted Matthias green :).  Complete.  Note: this switch is gone as you’ll see.  I realized it could be bumped on accidentally.


WP_20130531_001 WP_20130531_003 WP_20130531_004 WP_20130531_005 WP_20140623_017


Resawing some maple with my blades from timberwolfblades.com.  These have been great blades for me (even for my old ryobi benchtop).

WP_20130521_003  WP_20130521_001


Works great and can even make tiny reindeer, plans available on woodgears.ca

WP_20130504_003


A year out from the build and the saw still works great.  I had to replace a tire but that is it.  Great experience building it from scratch.  Its always nice to make mistakes on something that is more forgiving than a piece of fine furniture.  This was not terribly hard to do and I built it in just a few weeks.  Just over a month from start to final paint but I took some time off in between sections. It worked great resawing my maple I need for the nightstands that you will see  in a future post.

The new blog commences

My name is Mike.   I have had several people ask me to start writing a blog over the past few years.  I have finally got around to starting it.  This blog will cover a large range of interests from Chocolate work, Sugar, Woodworking, Jeeping, wood bandsaws,  furniture making, Classical Pilates, back rehab, to how to fix about anything from my LG washer and  my Bosch dishwasher, to just about anything else one can think of.  A jack of all trades, master of a few.  By day I do data center networking by evening and weekends I cover the rest of the fun stuff.